Sunday 30 September 2012

The Grecian Goddess Updo!

Hello!

We’re dying to copy Sarah Hyland‘s Grecian goddess Emmys updo, created by hairstylist John Ruggiero. And in case you are too, we got the scoop on how to recreate the look at home:


Step 1: Spray each section of hair with a volumnising hair spray.

Step 2: Create tight curls using a curler.

Step 3: Make a low bun at the occipital bone, then pin the curls loosely back into the bun.

Step 4: To add a Grecian feel, take two sections from behind the ears and braid them, pinning them into the bun.

Step 5: Finish with a styling spray , to keep the hair intact.

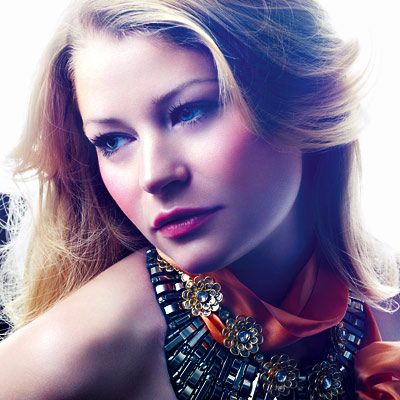
And ..this is what you'll get! :)

Sarah Hyland Emmys
 

Skin Savers in your Kitchen !

Hello!
The ingredients you find in our kitchen are  natural, healthful, packed with vitamins, minerals and nourishment. Yes! A pretty good rule of thumb in terms of naturals is that if you can eat it, you can massage it into your skin. Here are some of my all time faves:


Avocado
Luscious, high in vitamins C and E and a good source of essential fatty acids, avocado makes a nourishing, hydrating face masque especially great for dry or mature skin.
  • Mash 1/2 of a ripe avocado, adding a teaspoon of olive or sweet almond oil for extra moisture and spreadability.
  • Leave the mixture on your face for 10 to 20 minutes before rinsing off, preferably with a washcloth.


Honey
 Keep it in your kitchen to purify pores and help eliminate blemishes and fine lines. Honey can help hydrate the skin by drawing moisture from the air like a humectant, as well as exfoliate without irritation or scrubbing, so even the most sensitive people can use it.
 Honey makes a great cleanser or mask.

  • To use as a cleanser: Apply a small amount to damp skin and rinse well.
  • As a mask: Apply to dry skin until you can’t apply it any longer (i.e., it’s too darn sticky), leave on for 10 to 20 minutes and
  • then rinse off with damp cloth.


Lime juice
Fresh lime juice is a natural mild tonic astringent that removes excess oil without causing irritation or redness. The fruit’s antibiotic and antiviral properties also appear to fight the inflammation and infection linked to acne flare-ups.
  • Use straight on the skin after your cleanser or masque as a natural toner.
  •  Do not rinse.

Olive oil and sugar
Sugar is a natural alpha hydroxy acid and an excellent exfoliate.
A homemade sugar scrub will leave your skin looking and feeling soft, radiant and super smooth. Sugar is far superior to salt in that sugar has no rough edges.

  •  Mix together about a 1/4 cup of brown sugar and a tablespoon of extra virgin olive oil.
  •  Rub gently in a circular motion, and rinse with warm water.
  •  While still damp from your shower or bath, take some of that olive oil and massage it all over (mix in some of your favorite scent or essential oil first).
  • Olive oil is highly nourishing and makes a fantastic body moisturizer!
 

The Textured Braid

Hello!
 

Bored of the everyday pony tail ? and the everyday Braid ? Well, here's a new way of making a braid , looks very complicated but actually is not. Follow the steps below and get amazing results!


Step 1: Create volume at the crown of your head by backcombing with a round brush.

Step 2: Spray your entire head with hair spray, , to keep volume from deflating.

Step 3: Grab two large pieces of hair at the temples and cross one over the other so they end up on opposite sides of the head again.

Step 4: Start creating a fishtail braid, making sure to add pieces from the hair that’s hanging down as you go. Continue this until all of your hair is gathered into a single ponytail.

Step 5: Secure the ponytail with a very thin elastic.

Step 6: Take a piece of hair from the back of your ponytail and wrap it around the elastic to keep it hidden.

Step 7: Pin the end of the hair behind your ponytail with a bobby pin .


The Knotted Chingon! - for your hair

Hello!
 
Here's an interesting way of wearing a bun and getting rid of the boring hairstyle you carry everyday !
Knotted chignon hairstyle
Follow these 4 steps ..

Step 1: To give hair grip, spray all over with a texturizing spray or dry shampoo.

Step 2: Divide hair into two equal sections, like pigtails. Twist each section.

Step 3: Tie your two twisted pigtails into a knot at the nape of the neck. If your hair  is on the longer side, tie a double knot.

Step 4: Tuck the loose ends under and secure with hairpins.


Slick back Hair is BACK!

Penelope Cruz San Sebastian Film FestivalHello!

Guess who's back ?! the Slick Back Hair look!


Slicked back hair is a big trend this season, And it seems like it’s here to stay.

That said, the pomade-heavy hairstyle isn’t always easy to pull off. So we were happy to see Penelope Cruz work a variation on the runway look that’s subtle enough for the real world.


  • Peter Som Fall 2012 Fashion ShowThe actress went with a deep side part, but instead of using a pomade on both sides, she only slicked back one side. The look is a pulled together alternative to an updo.

  • This  models’ hair was slicked back on both sides of the part with natural waves falling down for a sharp contrast. This look has a sportier vibe, while Penelope’s version was perfect for the red carpet !

Shadows that Bring out your Eye Colour !


Taylor Swift

Hello!

Here are a few ways you can bring out the colour of your eyes, be it brown , green or blue ...u can always make your eyes look Special !

Blue Eyes 

 
Sometimes keeping it simple is best. A clean, precise line of copper eyeliner is all it takes to make Taylor Swift’s blue eyes pop. Lots of Black Mascara also helps to contrast with her baby blues to bring them out.
 
Dark Shades make  lashes look long.


Kat Graham

Green Eyes 


The best and brightest eye effect we’ve seen for Green Eyes , Kat Graham’s shimmery purple shadow that completely surrounds her eyes.
Since purple and green are opposites on the color wheel, they look extra vibrant when paired together.


Kim Kardashian

Brown Eyes  

If you eyes are dark brown like Kim Kardashian’s, go for a contrasting pale champagne shadow to make them pop.
 
You can also line the inside of your Lower Lash Lines with a cream pencil to enhance the effect,
 and load on lots of mascara.


Thursday 27 September 2012

Dressing up a Cardigan !

Hello! 

There are many ways of keeping it simple yet looking awesome...here are some thoughts on prepping up a simple cardigan , for a soecial evening :)


Belt It: Nothing can give a potentially librarian-ish cardi more va-vavoom than cinching in the waist, and, particularly If your chosen sweater already has a little bling built in, this season we’d suggest a skinny belt.
The look is modern (we’ve seen it on Rosario Dawson — love.) especially if you pick a skinny belt, and, for evening, some patent shine.
 And while you can match your belt to your sweater for a monochrome look, don’t be afraid to mix it up (we like deep purple with a pale gray, or silver with black).


Brooch It: Need to kick up your cardigan’s holiday flava, and want the cinched/wrap look without the belt? Try a fab sparkly brooch — wrap the cardi like you’re going to belt it and instead secure it at the waist with a pretty pin.
No need to spend a bundle ,, even a simple one would work wonders!


Balance With Some Sex Appeal: Still worried that a cardigan will be too, well, stuffy when you’d rather have some sizzle? You can look feminine and sexy in a cardigan if you like — it’s all about balance. The rule is if you’re covered up on top, you can show a little extra leg (of course, how much depends on the nature of the function — if it’s work related, keep it clean people).

The Military Trend !


Hello!

The mIlitarytrend was pretty in this season ..let's see how to carry it off the right way!


Do: 
…pick one military piece you love — whether it be a jacket, boots or skinny cargo pants — and pair it with decidedly non-military pieces (put the jacket, for example, with a tunic tank, dark skinny jeans, and embellished flats) for a modern look.

…pair your military inspired item with a pop of bold color or shine — since military-style pieces are usually neutral in color, a metallic skirt or, say, bright purple cami, will ensure that your look is anything but drab.

…be situation appropriate. As much as you might love the military look, that zip front military skirt might be more appropriate for Friday night than dinner at your boss’s house.


Don’t:
…wear camouflage, unless it’s SUPER subtle or unless your under 21 — again,
leave the fatigues to the real soldiers.
forget that it’s not just about combat boots and cargo jackets — it’s about color too.
Sand and olive are part of the trend, so if the more obvious details are all a bit much for you,
consider adding a drapey sand-colored tank (like this one from Bluefly) to look totally up-to-date but not over-the-top.

Dressing like a Rockstar!

 Hello!

We all feel like rockstars about ourselves at times..well..if you wanna dress up like a rockstar too..follow these simple steps ;)

Find inspiration. Look at all the popular groups in your genre with female leads and take notes on their personal style.
 Look and see what elements of their style you like and can easily incorporate into your existing wardrobe.
 For example Courtney Love’s Hole-era style of baby doll dresses and heavy make-up was a great rock chick look.
Babydoll dresses are a HUGE trend this year


2. Develop a Signature Piece.
Do you have a signature items that you wear everyday like stiletto heels, scarves, bright red hair, etc?
If not, develop a signature item that is uniquely you that will make you and your band standout from the pack.
 For example, always wear the babydoll dresses with stilettos or wear it with converse hot top sneakers.
Maybe rock an awesome hair cut (with a shocking color) with sweet floral dresses.
  Focus your energies on maintaining or building a collection of these items. Always try make sure you have one feminine and one rocker element in all of your outfits.


3. Know Your Stores. Know which stores can offer you the best clothing and be LOYAL!


4. Make sure you can maintain it.
 Until you become a star, you’ll be doing your own make-up and acting as your own personal stylist. Make sure what ever style you create can be maintain on the road and with minimum help from others.It’s important that you “own” the style, so when you become a rock star, the image carries over.

Nail Art - 3D heart Design


How to Do a Heart Burst Manicure


You’ll need a minimum of three colors. I chose a nude, pink and purple.


Heart Burst Nail Tutorial Step 1 Be Still My Heart: Heart Burst Nail TutorialStep One  After filing nails and waiting for your base coat to dry, paint one to two coats of your lightest color. Wait at least 30 minutes for the polish to dry. I like to wait an hour to remain on the safe side


Heart Burst Nail Tutorial Step 2 Be Still My Heart: Heart Burst Nail TutorialStep Two Apply tape. I used striping tape,  you can use trimmed Scotch tape. You’ll need four pieces for every nail.


Heart Burst Nail Tutorial Step 3 Be Still My Heart: Heart Burst Nail TutorialHeart Burst Nail Tutorial Step 4 Be Still My Heart: Heart Burst Nail TutorialStep Three Alternating every other space, paint the triangles your second color.


Step Four  Wait at least 10 to 20 minutes before removing the tape. You’ll be left with this design, which is actually pretty cool.


Heart Burst Nail Tutorial Step 5 Be Still My Heart: Heart Burst Nail TutorialStep Five To create the hearts, I used the back end of a paintbrush to create two small dots. You can also use a straight pin, bobby pin or dotting tool.


Heart Burst Nail Tutorial Step 6 Be Still My Heart: Heart Burst Nail TutorialStep Six Create a V-shape underneath the two dots and fill in the center.


Heart Burst Nail Tutorial Step 7 Be Still My Heart: Heart Burst Nail TutorialStep Seven  Wait for the hearts to dry and then apply a topcoat to seal in your design. Use a cotton swab dipped in nail polish remover to clean up the cuticles.
 

DIY- Funky Bracelet !

statement bracelet 1 How to Make a Statement BraceletHello!

Here's a great way to create your own funky bracelet!


Supplies you need :
  • Gold and silver chain ,
  • Rhinestone,
  •  Black Suede rope,
  • pliers,
  •  bracelet closure.


Follow these steps :   


statement bracelet 4 How to Make a Statement Bracelet
 1. Tie together the two pieces of chain (two chain should be the same size links so they match up when weaving rope) with a double knot.statement bracelet 5 How to Make a Statement Bracelet


2. Place the rhinestones in between the two pieces of
 chain and begin weaving all three.
statement bracelet 7 How to Make a Statement Bracelet
3. Using your pliers, remove any extra links so all three chains line up. Double knot at the end.
statement bracelet 81 How to Make a Statement Bracelet
4. Tie the closures on each end. Trim excess rope.


statement bracelet 3 How to Make a Statement Bracelet

5. Fasten around your wrist and to create a great mixed metal look!


DIY- Make Gold Clutch !

Hello!

Many of us would would be wanting a Gold Clutch to carry to a party or an evening out with friends...well..there's no need for yout to buy it and waste money . Go easy on your pockets and just get a Tape and  Spray Paint ;)

Here are two simple steps for you to follow , to get a Gold Clutch :


red clutch How to Make a Gold Clutch
1. Tape off the area that you would like to be gold.


spray clutch How to Make a Gold Clutch

2. Holding the spray paint at least 6″ away, spray a thin layer, covering the bag.
3.Let dry for at least 1 full day.
4.Make sure to put newspaper or an old cloth under the bag to protect the surface below.


And Here it is !  


Monday 24 September 2012

Fall's Stand out Toppers!

Hello!
 
There's no use in a great outfit if you're covering it in a less than killer coat!

 Solution:ultra stylish designs in the season's top trends. From cool leather details to ladylike waist-cinchers, these toppers are so chic you may want to leave them on indoors!


Look of the Day photo | H&MLook of the Day photo | Oasis


Look of the Day photo | ASOSLook of the Day photo | River Island
 

Transforming Summer Pieces into Fall

Hello!
Don't pack away your summer pieces just yet! With just a few simple styling tricks you can take your favorite warm-weather basics into fall (or from casual to office-friendly...or day to night!) just like Blake Lively, Alexa Chung, Brooklyn Decker and more.


Look of the Day photo | Tuxedo-Stripe PantsTuxedo-Stripe Pants

Sometimes making a seasonal transition is as simple as extending your sleeve length. Miranda Kerr wore her two-tone A.L.C. trousers with an arm-baring top, while Blake Lively styled her Lanvin pair with a long-sleeved shirt.


Look of the Day photo | Red DressRed Dress

That perfect strapless red dress can span the seasons with addition of a clever cover-up. Charlize Theron wore her Lanvin peplum design sans topper, while Brooklyn Decker warmed up her Katie Ermilio wrap dress with the addition of a blazer and close-toed shoes.


Look of the Day photo | Black ShortsBlack Shorts 

It doesn't get easier than this! Make a classic pair of black shorts winter-ready with the addition of opaque tights. Ginnifer Goodwin and Alexa Chung wore nearly identical outfits, with the exception of Chung's warmth-adding hosiery.

Ways to Look Better in the morning !

Hello!
 
Here are some tips for you to look good in the morning ! We all have our days when we might not look that bright and shining early int he day , hence , follow these steps to look your best :)


Prep Hair Before Bed

If your fine strands tend to look greasy the minute you open your eyes, "use a dry shampoo preventively,". Spray roots until hair feels chalky. "The powder will suck up oils as they're produced,". "Come morning, you won't have to degrease or worry about seeing powdery residues." Then you can style and go!

Look of the Day photo | Put Down the PopcornPut Down the Popcorn 

If you want to wake up with a flat tummy, close the kitchen two hours before hitting the sack. Absolutely craving a late-night snack? Avoid anything salty. "Cut up a grapefruit and grate some fresh ginger over it.

 Grapefruit is hydrating, and ginger is an anti-inflammatory that has the added benefit of calming skin.


Look of the Day photo | Pour Some Fennel Tea

Pour Some Fennel Tea 

"The seeds fight gas, meaning you'll awaken less bloated,". The licorice-y flavor might take some getting used to; Slayton suggests adding a splash of lemon juice to brighten the taste.


Cleanse, Rinse, Repeat

To prevent smudgy raccoon eyes, wash twice in the evening. "First, use a milky cleanser to remove makeup,. "To make sure there's nothing left behind, follow with a gel cleanser," which eliminates oily residue.

Stick a Bandage On It

You may not want to smother a zit with makeup, but hydrocortisone? "Go for it!"

. Before bed, slather on the anti-inflammatory cream, then seal it in with a waterproof bandage. "This intensifies the potency, so the next morning the pimple will be smaller and less red. It's nearly as effective as getting a steroid injection."

Two Tone Makeup!

Trend to Try Now: Two-Tone Makeup  


3-D Cheeks

WHY IT WORKS :  Layering bronzer and blush has a double benefit. "The bronzer brings out cheekbones and makes the face more three-dimensional,". "The blush gives a glow."


HOW-TO After smoothing lightweight foundation onto de  skin,  use the  fingers to swirl cream bronzer around the sides of her face in a large "3" shape, starting at the temples, working down to the upper cheekbones, and continuing down to the jawline. Then  layerpink cream blush along the apples of the cheeks, right on top of the bronzer.


Look of the Day photo | Ombré LipsOmbré Lips 

 
WHY IT WORKS This two-tone look subtly contours the mouth, . A darker shade around the periphery adds definition, while a slightly softer tone in the center reflects light and creates the illusion of fuller, juicier lips. The key is to use two shades in the same color family "They should gradually fade into each other for an ombré effect."

HOW-TO Puckey used a firm brush to precisely apply a deep carnation hue along de Ravin's lip line, then blended it toward the center. Next, brush a paler bubblegum pink into the middle of the top and bottom lips.


Look of the Day photo | Double Duty EyesDouble Duty Eyes 

 
WHY IT WORKS Contrasting colors on the lids makes for subtle drama and a supersize effect. Here, copper shadow brightens eyes as deep plum elongates them.

HOW-TO Puckey covered the outer corners of de Ravin's lids with purple, then blended it out into a wing shape to "fade the color,.
 Next,  apply  shimmery copper at the inner corners of eyes, blending into the creases and up to the brow bones with a Q-tip.
To finish, sweep copper under the lower lashes and apply  three coats of black mascara.

Headbands - a trrend that is Cute :)

Look of the Day photo | Dress Up a Pixie
Hello!

 Headbands back into the mainstream—and seeing them on every teenager made us weary of them once again. But stars like Michelle Williams, Alexa Chung and Charlize Theron are wearing headbands on the red carpet in innovative, irresistible ways. Get inspired to try the look this spring!


Dress Up a Pixie  

If your hair is short, the right headband is an easy way to make it glamorous. Choose one that’s slim and lies flat against the head, like Michelle Williams and Evan Rachel Wood. Chunky details like flowers or bows can be
overpowering.


Look of the Day photo | Try a Floppy BowTry a Floppy Bow 

Dig a ribbon from your wrapping paper stash and try this easy look:
Cut a piece long enough to wrap around your head twice. Position it at the base of your neck, pull the sides up behind your ears and tie in a loose bow.
Twist the bow off to one side for an irresistibly adorable look like Zooey Deschanel and Jessica Capshaw.


Look of the Day photo | Opt for Ultra-ThinOpt for Ultra-Thin 

A skinny headband makes a sophisticated statement.
Take a tip from Ginnifer Goodwin and Busy Phillips and opt for one in neutral tones like gold, ivory or silver, and be sure that it fits snugly.


The Perfect Brows! ;)

Hello!

Your boldest accessory isn't sitting in your closet—it's perched right on your face. These three eyebrow makeovers are as easy as one, two, tweeze!


Look of the Day photo | Define Your Arches

Define your Arches!
Extra definition like Camilla Belle's will give your face an instant lift, and open up eyes. Find your natural arch by placing a finger above the outer half of your brow and lifting up the skin.

 "Your arch should be where your brow naturally bends. Fill in your brows with a pencil, then pluck one row of hairs from the bottom, following your natural shape. Brush hairs upward with brow gel or clear mascara to hold and enhance the look.


Look of the Day photo | Go ThickerGo Thicker 

 
Take note of Mary-Kate Olsen's bold brows. "Thick brows make your face look more youthful and can frame your eyes better.

 Thicker arches work best on natural brows, so let all hairs grow in for three to four weeks before having a pro shape them.

To fake fuller brows in the meantime, dip an angled brush into a matte shadow in a matching shade, or use a pencil to fill in large gaps.
"Be sure to apply in short, light strokes, and follow your current shape for the most natural look.


Look of the Day photo | Shift Your ShadeShift Your Shade 

 
Made a major hair-color change like Drew Barrymore? Consider altering your brow hue with a tinted brow gel—it'll coat each hair and "look more natural than powder or pencil, which can sit on skin.

 If you're after a longer-lasting hue, think twice before experimenting at home. It can be risky to use permanent dye so close to your eyes, and it's tricky to get the color just right.  

Ageing Myths Busted!

Hello!
 
Ageing is a very natural process that everyone on their lives goes through . However, many of us try and fight it , in order to look younger ...but in the process we sometimes end up making it look even more evident. Here are a few myths about ageing that every woman must know.
 
Be comfortable with what  you are and how your skin looks :)


1. MYTH: Peeling Face=Stop Retinoids.

REALITY: The irritation many people feel when they add these vitamin A-based creams to their regimen are "all part of the process,"  To see results, you have to persist. If it's too uncomfortable, he suggests using a retinoid  every third night. After two weeks, go to every second night, then every night.


2. MYTH: SPF only matters on the face.

REALITY: If you don't protect your neck now with SPF, prepare to be covering up in your 50s. The same age-fighting ingredients you put on your face can also be applied below the chin, but be careful with retinol and acids. "The skin on the neck is more sensitive , it is  advised that  you use retinol on this fragile area no more than two or three times a week.


3. MYTH: If makeup has SPF, you're safe.

REALITY: Unless you are slathering yourself in foundation, your coverage is inadequate. it is recommended  wearing at least a teaspoonful of sunscreen on your face every day. Protecting your skin from the sun lets the repair enzymes shift from defending skin to healing it.


4. MYTH: With age, add more foundation.

REALITY: Actually, the reverse is true. As you age, base tends to settle into wrinkles and lines, which makes skin look duller. This is especially problematic for women over 40, who have already lost some luminosity as the turn-over rate of their skin cells has slowed. Instead, apply a lightweight tinted moisturizer  in place of a heavy foundation. See a dermatologist to fix the uneven skin tone that you're tempted to cover up.

Makeup Blunders and their Solutions !

Hello!

Makeup blunders do happen a lot ... and sometimes we might not have the right solutions for them !

Well, here are a few makeup blunders along with their solutions.. try them out, they will definitely work and can be pretty helpful too! :)


My makeup brushes ruin in no time! 

You might not be cleaning them often enough. Letting brushes sit with product on them for too long can permanently damage the bristles. Washing them once a month with dish detergent, which breaks down the oils and pigments that build up in the hairs. How you dry your brushes is critical too. After a rinse, lay them flat on a paper towel. "If you put them upright in a cup, water can seep into the base and rot the brush.


Concealer for dark circles is cakey!

Piling on a heavy cream concealer isn't the way to go. "Liquid formulas absorb more easily under the eyes and cover circles without caking,". Go for an opaque fluid with a peach base, which will help counteract the blue-gray tones. Still seeing shadows? Try a dusting of fine, light-reflecting powder over concealer to brighten.


Look of the Day photo | That icky white film from lipgloss!That icky white film from lipgloss!

It's when lips are dry and flaky that particles can get trapped in the creases and create a gunky coating. Exfoliate your pucker with a washcloth before applying gloss. You can also run a cotton swab along the inside of lips to remove the film. Or switch to a glossy balm.It gives the same shiny look but no residue."


Hair grows quickly after shaving!

Sometimes tiny hairs get trapped under the skin's surface by dead cells. A light scrub with a loofah before shaving will exfoliate and free hidden hairs so you can remove them in one clean sweep. If you get prickly hairs, use a moisturizer with urea or glycerin ,  to soften and help them lay flat.

Look of the Day photo | I get mascara on my eyelids!I get mascara on my eyelids! 

That's because mascara can break down when it comes in contact with oils on your skin, leaving telltale spots. If you don't plan on wearing eye shadow, try this: Before coating lashes, create a matte canvas on lids with primer, then top it with a translucent powder. Look for ones with silica which "absorbs oil like nothing else.


If you have any solutions to any of the makeup blunders , please feel free to post them on the blog :) your  suggestions are always welcome!